I think we all like stories where the other guy has a minor prat-fall. It makes the other guy human and it is an easy lesson to absorb, "Don't do what that guy did."
I had one of those prat-falls last week. The good news is that I learned from it and made changes.
My mom has one of those round, fluorescent light fixtures that were state-of-the-art in 1965. The light was in the laundry room. It was flickering and not igniting.
Being semi-handy, I decided to change it out.
I threw my tool boxes and materials in the back of the truck and drove over to Mom's.
Once I got to Mom's, I discovered one of the doors to the back of the topper had swung open and one of my tool boxes had ejected.
Fortunately, it was mostly filled with small, electrical parts like wire nuts, crimp-on connectors and the like.
The real problem was that the latching system for the door had two issues.
The biggest issue was that the guide for the lower-dog was too low. It originally had a bushing in it but the bushing was missing. When the dog was retracted, it pulled out of the hole and free-floated.
The fix was to drill out the rivets and spin the guide around. That is, change it from an "L" to a "7". Then reattach with machine screws. This image is after the fix and after liberally snotting everything up with grease.
Now it is impossible for the dog to travel high enough for the end to pull out of the hole in the guide.
 |
| You can see wear marks on the head of the rivet at the top of the image. |
The other issue was that the rotating detail on the inside of the handle dragged against one of the pop-rivets holding the assembly together. If you were in a hurry, you might think you had bottomed out the dog when in fact you had hung-up the square edge against the rivet.
The fix was to grind a ramp on the square edge so the piece can freely cam-over the rivet head. Oh, and add more grease. The image is of the rotating detail after I ground the edge.
Shelving
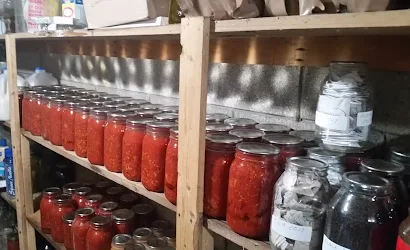
There I was, looking at the results of Mrs ERJ's canning and I thought, "It would be a shame if this was the year the shelving decided to disassemble itself"
The shelving is constructed of 1"-by and assembled with ungalvanized, box nails. Over the years last 45 years, the shelving has seen salty fluids leak on them and been cleaned with bleach-and-water solution. Both are corrosive.
The fix was to insert lengths of 2"-by-3" between the shelves to take load off the nails. At least, I hope it is a fix.
The top shelf was not reinforced because we never put heavy things on that shelf due to reach constraints.
I am pretty happy to have "fixed" this before we had an accident.
Bonus tomato picture
 |
| Stupice tomatoes after cutting in half. This is how we canned them this year: In skins. Mrs ERJ likes this variety because it is very clean and has almost no core. |


On the shelving, I put a strip of trim just above the shelf across the front and sides. Quarter inch by one inch stock. About 2 to 3 inches up. Just something to help keep the jars from falling if bumped into. Please don't ask me how this came about!
ReplyDeleteDon't forget to check the back side.---ken
ReplyDeleteJob well done!
ReplyDeleteThat is a NICE pantry! And a lot of 'maters! :-)
ReplyDelete